
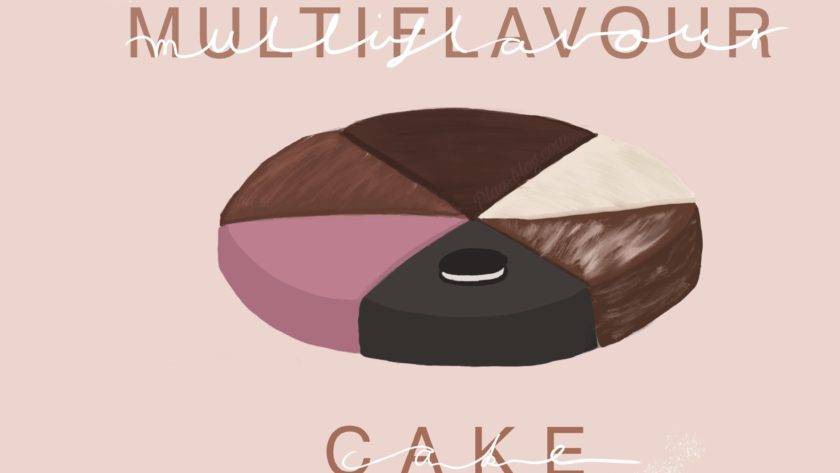
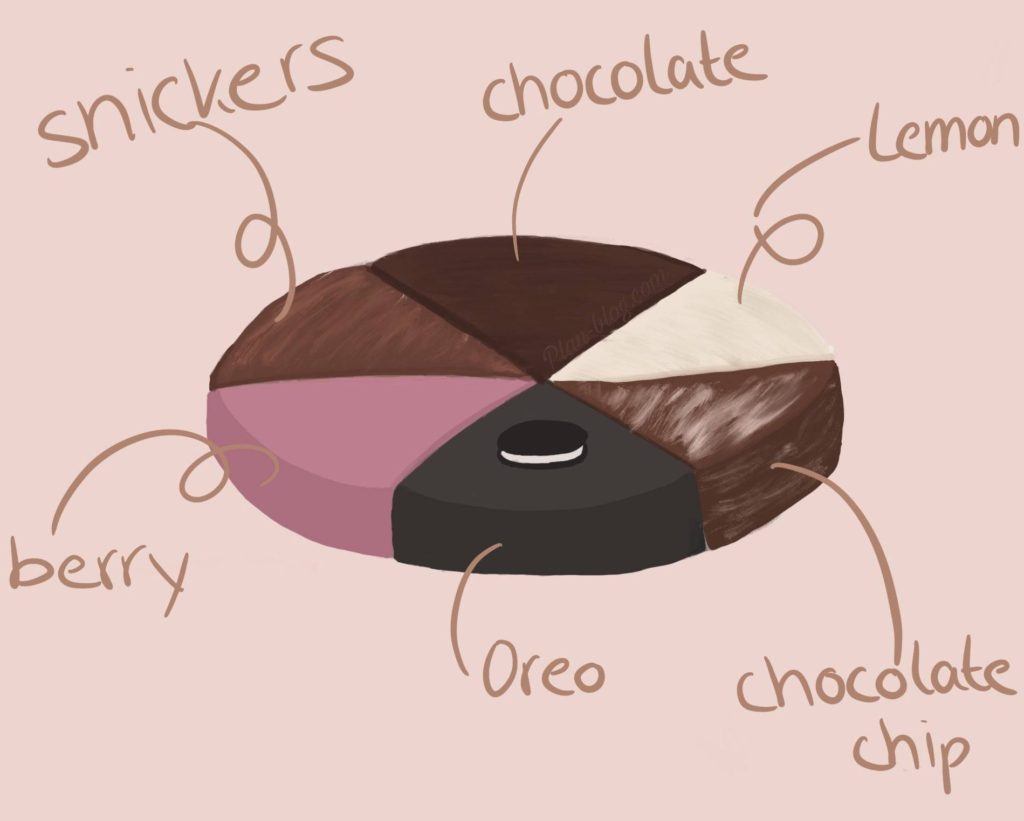
What to bake? That is a question one might ask oneself especially when a birthday party is just around the corner. But we’ve got the perfect solution for everyone: a multi flavour cake. Including Oreo-, Berry-, Snickers-, Choclate-, Choclate Chip- and lemon- flavour.
Instructions
Ingredients
for the base…
- 3 cups flour (400g)
- 3 tsp. backing powder
- 1/2 tsp. salt
- 1 cup butter (225g)
- 4 eggs (room temperature)
- 1 tsp. vanilla extract
- 1 cup milk (480ml)
- 2 cups sugar (400g)
Oreo – Piece
- 16 Oreo cookies
- black gel food colouring
- 1/2 cup butter (115g)
- 1 cup powdered sugar (115g)
Berry – Piece
- 5 tbsp rasberry jam
- 1/2 cup butter (115g)
- 1 cup powdered sugar (115g)
- 1 Joghurette (for decoration)
- pink gel food colouring
Snickers – Piece
- 1 snickers bar
- 1/2 cup shelled peanuts, chopped (79g)
- 3 oz caramel sirup (100ml)
- dark choclate
- caramel creme
Chocolate – Piece
- 4 tbsp cocoa powder
- 1/4 cup choclate chunks (40g)
- milk chocolate ganache
Lemon – Piece
- 1 lemon
- powdered sugar
- water
Choclate Chip – Piece
- choclate chips
- milk chocolate ganache
Preparation
Base
Once you have everything ready and measured we can start preparing the six different batters for our multi flavour cake. First off all we mix flour, backing powder and salt together in a medium sized bowl. We continue our base by then mixing in the room temperature butter one by one. Once the butter-flour mixture is well combined (DO NOT OVERMIX) we can add our sugar. In a separate bowl you can now mix together all remaining wet ingredients, being milk, eggs and vanilla extract. Once all of them are an even liquid you can add it to the flour-butter-sugar mixture. Now that our base for all six flavours is done, we can divide the batter into six evenly distributed portions.
Bowl 1 – Oreo
To prepare Oreo flavoured slice we would recommend using a dark coloured bowl or one that is not one of your favourites because the food colouring might stain. To start put aside one of the 16 cookies and remove the filling from the remaining 15, put aside. Next up crush the remaining cookie part of the Oreo in a zip lock bag. You can then put the crumbles into the base batter. Before mixing, add the black gel food colouring as well. Slowly add more depending on how dark you want the cake to be. Remember that the actual color of the cake will be a bit lighter baked.
To now prepare the filling of the Oreo cake we are going to start by mixing together the butter and powdered sugar. Once it forms a light and fluffy consistency you can add your Oreo filling. Stir again until well combined. Store in the fridge until needed.
Bowl 2 – Berry
For the second cake we begin by adding the raspberry jam and pink food colouring to one of the five remaining batter portions. Mix until the food colouring is well distributed.
For the filling just combine the butter, powdered sugar and a bit of jam to taste. Once well combined put in the fridge to chill for at least 45 min.
Bowl 3 – Snickers
The batter for the Sickers flavor is quickly prepared as you just have to add the chopped peanuts and caramel sirup to the mix and stir.
Bowl 4 – Chocolate
… Same goes for the Chocolate cake. Simply add the chocolate chunks and cocoa powder. Stir until there is no powder left on top, once that is achieved just set the bowl aside. Make the ganache following the instructions of the recipe we linked in the ingredients.
Bowl 5 – Lemon
To start with our lemon batter we firstly have to grate off lemon skin (organic lemon) and add it to the batter. As we are not going to fill this cake just squeeze the remaining lemon juice and water into bowl or a small cup and combine it with the powdered sugar so make a sugar glaze. If you want you can cut off a small slice of the lemon and put aside for decoration.
Bowl 6 – Chocolate Chip
For our last and final cake we just add chocolate chips or chunks (depending on your personal preference) to the batter. For decoration we are just using the ganache we already used for the chocolate cake.
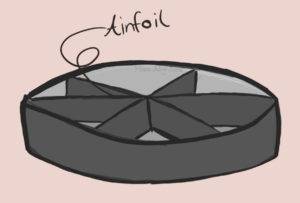
Now that all of our batters are ready we gotta prepare the springform. For that we most importantly need dividers. Those you can make yourself by folding up tinfoil until is becomes sturdier. Repeat this step three times. Then align all three stripes in the Springform; one straight across with a line not all the way cut in the middle of the stip. The next one is to be stacked in the cut we made earlier. The last tinfoil strip has got to be cut in a similar way as the first one but stacked upon the second one with the remaining closed part facing up. Afterwards we suggest you grease the Springform with either butter or oil.
To now bake your prepared batters you want to preheat your oven to 180°C (360°F). In the meantime you can fill the six different compartments with the cake batters. For that we recommend you filling them up halfway at first to keep the forms from spilling or leaking. Once all of the compartments are filled halfway you can scoop in the remaining of your batters.
Once your oven is preheated you can put your piece of art inside and let it bake for 30 – 35 min. (or until the toothpick test comes out with only little residue).
Assembly and Decoration
It is very important that you let your cakes fully cool before you start assembling or decorating your Multi-Flavour Cake. To start the whole process you gotta loosen the cake from the tinfoil very carefully. Now we can start with the fun part…
Decoration
Oreo
Start by cutting the Oreo slice horizontally in half. Fill the bottom half of your cake with the cream we made earlier. It is a nice add on to spread the cream all the way to the edge of the cake to create a similar look to a real Oreo cookie. To top it all off just put the top half back on and add a very small amount of cream to stick the 16th Oreo to. And we are all done with our first slice.
Berry
For our berry cake we are going for a similar approach. Cut the cake horizontally in half and fill with the raspberry butter creme. Put the top half back on and continue by covering the whole slice in the remaining creme. Now to finish it up just place the Joghurette candy bar on top.
Snickers
Our third cake slice will be decorated with a chocolate coating on the outside. Therefore you have to melt your chocolate (you can temper it if you want). In the meantime we can also start on our caramel by letting sugar butter and a pinch of salt heat up on the stove until it melts and forms bubbles. Add in your cream and keep stirring until well combined. Set aside to cool down to room temperature. We continue by again cutting our cake in half and filling it with the caramel. Put the „lid“ back on and cover the cake with the chocolate we tempered before. Add a cut snickers bar on top and we are done with our Snickers slice.
Chocolate
As complicated as the first three cakes are to make the easier are the following. Just cover the chocolate slice with ganache and sprinkle a few chocolate shavings on top.
Lemon
For our fifth cake just apply the sugar coat we set aside earlier and place a lemon slice on top.
Chocolate Chip
The last cake is as easy to assemble as the last two. Simply cover the slice in chocolate ganache and maybe create a marble effect with some of the leftover Oreo creme filling.
Now we just have to place all of the prepared slices on a plate or a cake board. And there we have it! The perfect Multi-Flavour Cake for every special occasion with something for everyone!